Hello,
I wanted to share with you some cards I made from a sheet of patterned cardstock, some Bazzil solid color card stock and some SRM Twine. Fast, simple, and easy, and ready to have on hand for those occasions that come up unexpectedly.
I just cut the strips off the printed sheet and adhered them to the solid cardstock. I measured my blank cards and made sure to line up all the fronts the same. That way, if you wanted to give them as a gift they will all look uniform and give a better presentation.
I edge punched the bottom of the solid cardstock with different punches. I then stamped sentiments on (some crookedly) :( Another option would have been to use SRM sentiment stickers - they make them for all occasions. I thought the twine added a little something extra and was glad I had colors to match!
From this one sheet of printed cardstock I was able to make 12 cards! Six for me and six for someone else!
Look for a sheet of paper and do the same - I had so much fun and the supplies I needed out were minimal. That's what I call fast and easy cards!
Enjoy creating!
Sharon
Thursday, July 25, 2013
Fun With Prima Flowers & Doilies
I just love Prima's flowers! They are so pretty and come in so many styles and colors. I find, though, that when purchase them I save them, and save them....I don't want to use them up!
Well, I went wild and used some on a couple of projects!
I found this box at a thrift store and picked it up for fun - one can't have enough boxes to cover, can they?
After covering and adding brown grosgrain ribbon, I added a simple doily and Prima flower and leaves. I think it is ready to be used to house treasures!


Next, I put a Prima flower on a doily with a leaf. After it dried I added a pin disc with E6000 to the back and tacked down the flower and leaves a bit more with The Ultimate glue. Now I have two pins to dress up a sweater or top, or a hat, or a jacket.... (you get the point!)
Thanks for stopping by and sharing my creations with me!
Fondly,
Sharon

Well, I went wild and used some on a couple of projects!
I found this box at a thrift store and picked it up for fun - one can't have enough boxes to cover, can they?
After covering and adding brown grosgrain ribbon, I added a simple doily and Prima flower and leaves. I think it is ready to be used to house treasures!
Next, I put a Prima flower on a doily with a leaf. After it dried I added a pin disc with E6000 to the back and tacked down the flower and leaves a bit more with The Ultimate glue. Now I have two pins to dress up a sweater or top, or a hat, or a jacket.... (you get the point!)
Thanks for stopping by and sharing my creations with me!
Fondly,
Sharon
A Sunset South of La Jolla Cove
Hi There!
Wanted to share with you some pictures I took of a sunset - Is there anything more beautiful than a sunset?!
We all went to the beach and had a great time gazing in the tide pools and finding little shells and sea glass. The weather was perfect and before we knew it we were being blessed with the most beautiful sunset!
I will warn you - I had a hard time choosing photos - so there are quite a few. Hope you find one you really like!
Fondly,
Sharon

Wanted to share with you some pictures I took of a sunset - Is there anything more beautiful than a sunset?!
We all went to the beach and had a great time gazing in the tide pools and finding little shells and sea glass. The weather was perfect and before we knew it we were being blessed with the most beautiful sunset!
I will warn you - I had a hard time choosing photos - so there are quite a few. Hope you find one you really like!
Fondly,
Sharon
Monday, July 22, 2013
Graphic 45 French Country Cards
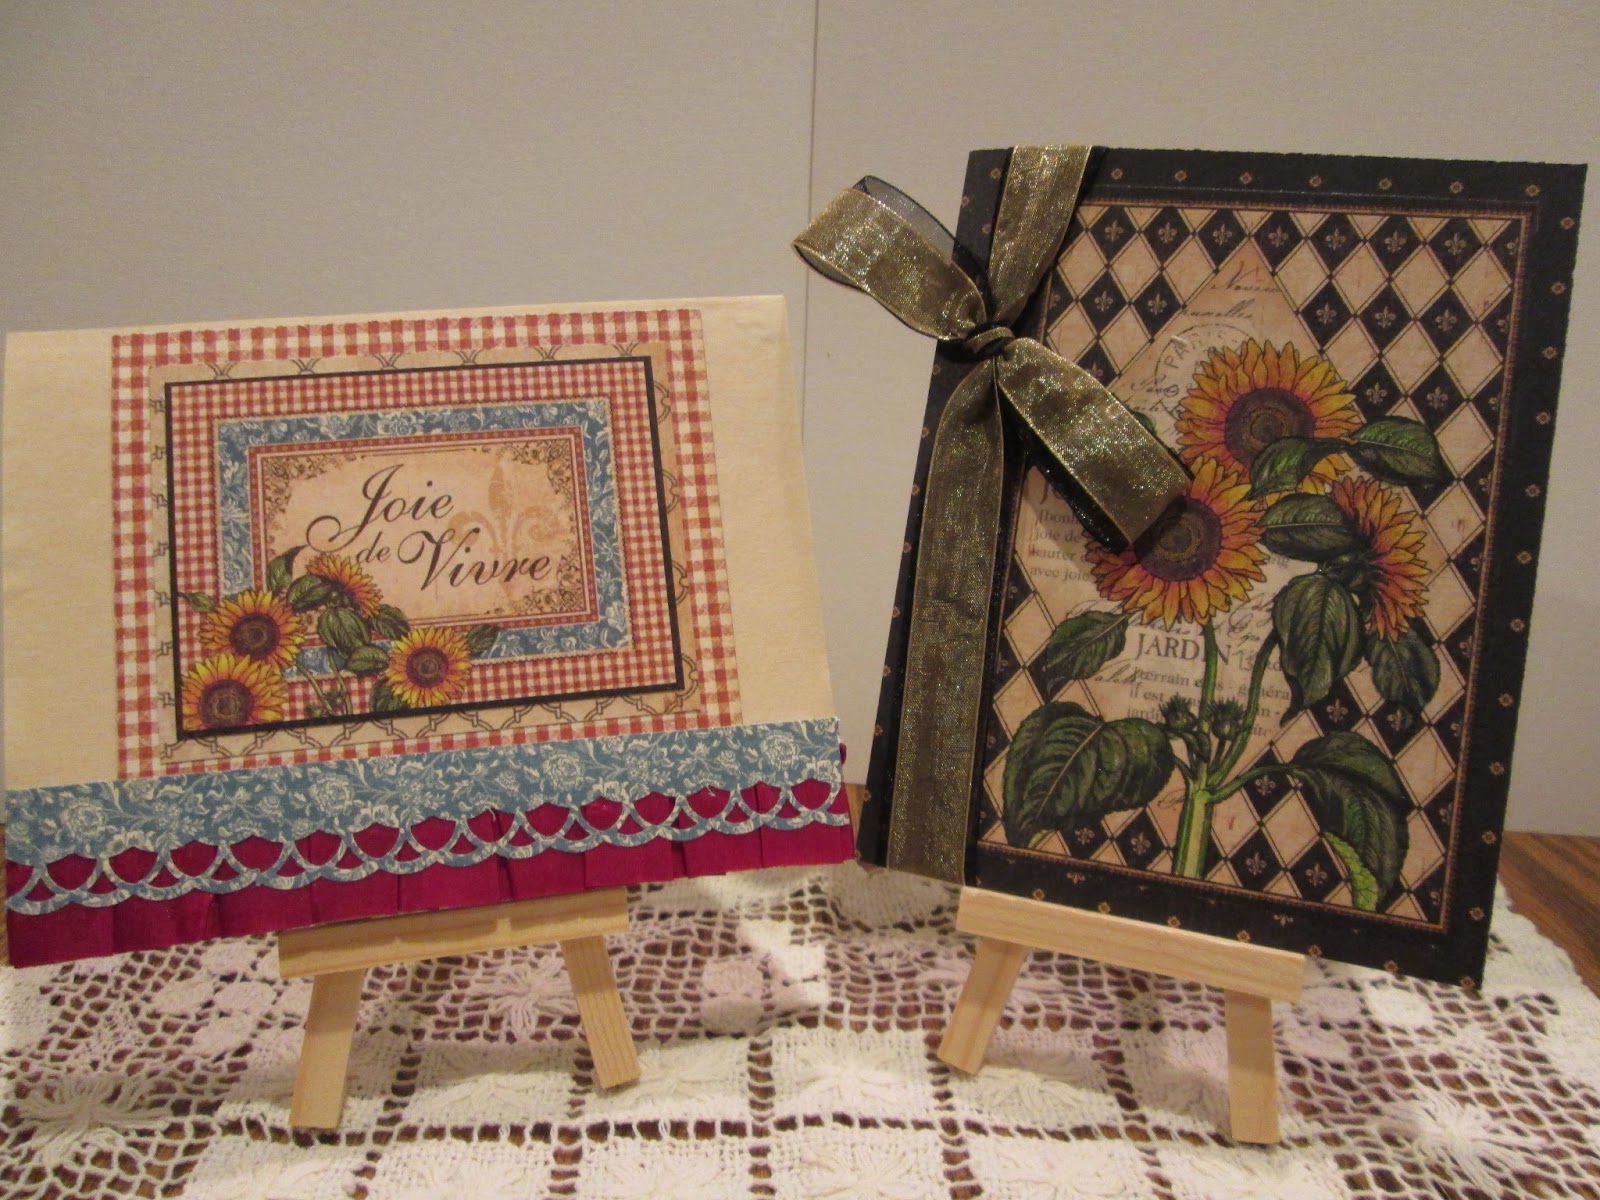
Hello! I am sharing with you some cards I made from the Graphic 45 French Country paper line. I just can't seem to get enough of this beautifully, printed paper!
I used two sheets of the same sheet of cut a parts - one for the front of the cards and the other for the insides. I had so much fun mixing and matching, finding different ways to embellish, deciding upon which of the other papers in the line to use for the backgrounds and edgings...to put it mildly, I had a creative good time making these cards! (I may have to go back and make some more!)
I hope you enjoy looking at them half as much as I enjoyed creating them. Graphic 45 is a wonderful paper line that makes it easy and fun to create cards and so many other beautiful items. Brace yourself, they have three new lines coming out shortly, and I am hoping to be able to share some creations made with those lines as well.
Wednesday, June 26, 2013
Embroidery Hoop Project Finishing Touches
Quick follow up to my post on my embroidery hoop project I posted yesterday (or earlier today, actually...)
I decided it needed some finishing off - something to frame the hoop and give it a more completed feel. I happened to have a doily that fit perfectly around the hoop with the delicate scallops encircling in a way that I fell in love with.
I think this finishes off the project nicely, and so does Ellen. She can't wait for it to dry so she can hang it in her room.
I love when things come together so nicely....
Sharon :)
I decided it needed some finishing off - something to frame the hoop and give it a more completed feel. I happened to have a doily that fit perfectly around the hoop with the delicate scallops encircling in a way that I fell in love with.
I think this finishes off the project nicely, and so does Ellen. She can't wait for it to dry so she can hang it in her room.
I love when things come together so nicely....
Sharon :)
Tuesday, June 25, 2013
Embroidery Hoop, Buttons & Stitches
Hi There!
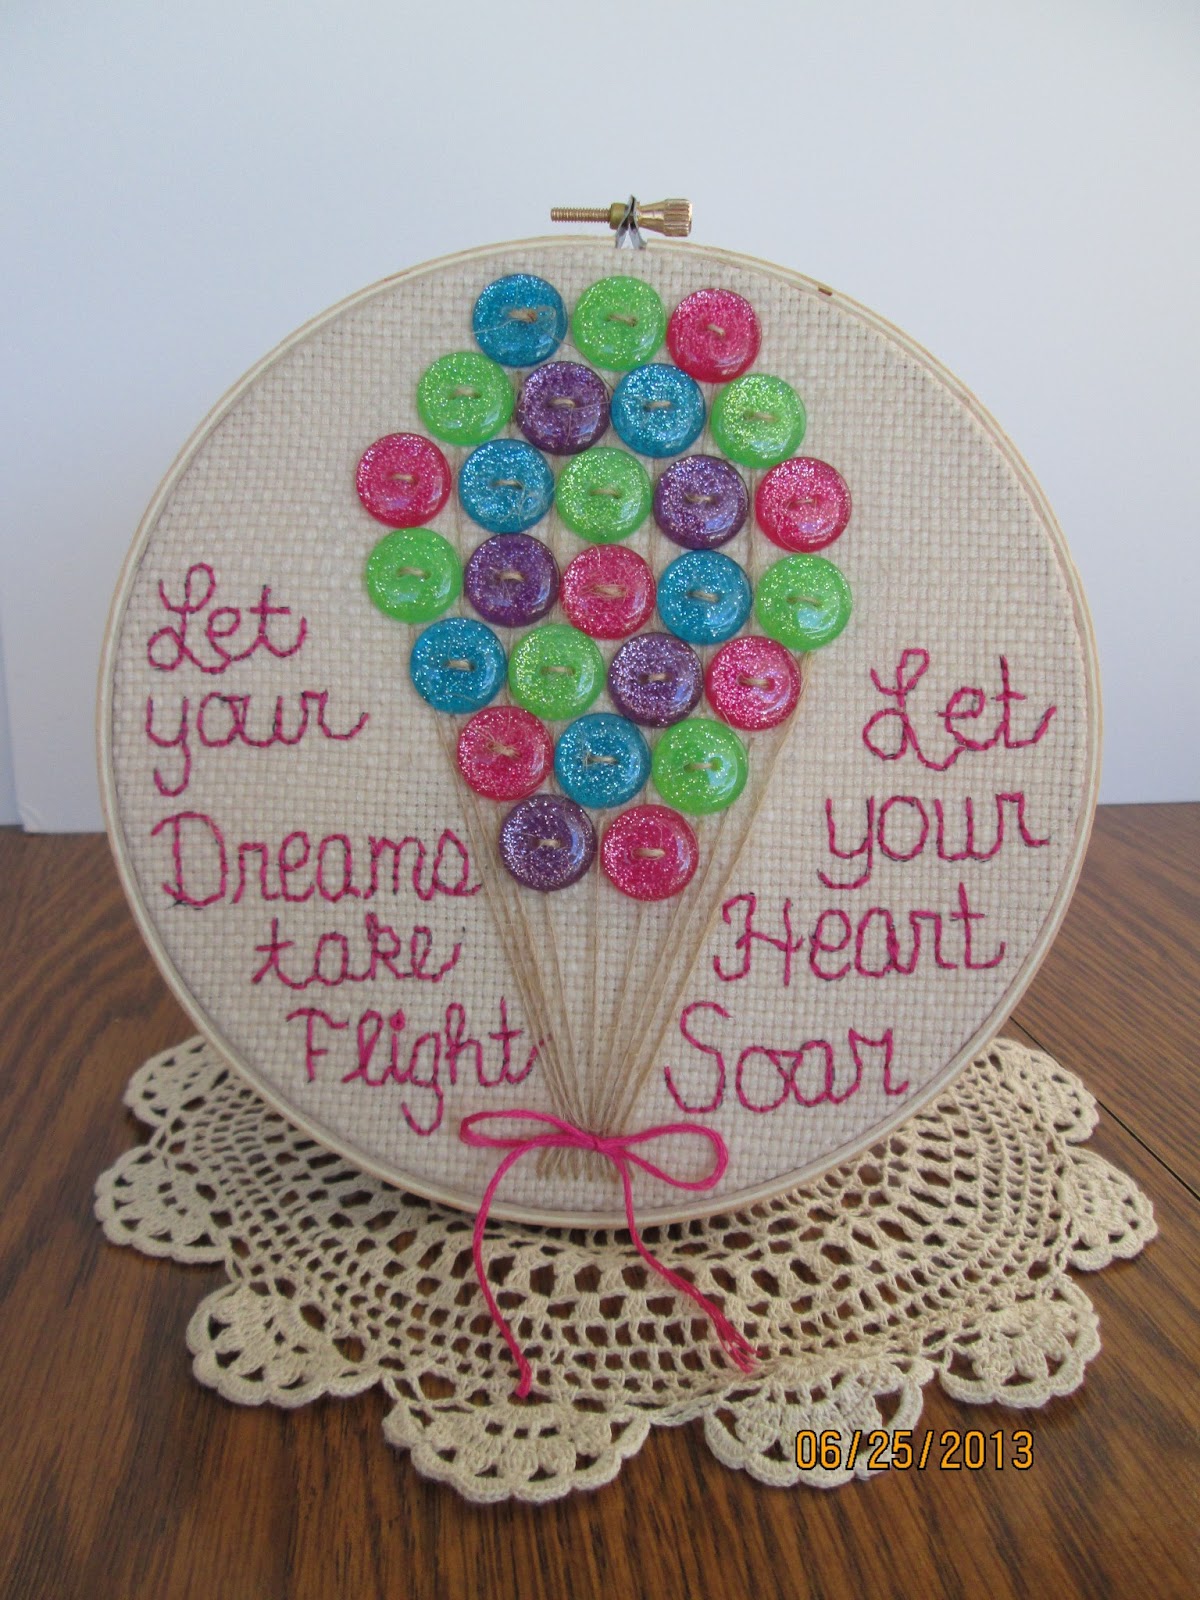
I had an urge to do a craft that I haven't done in quite some time - embroidery! I got the idea from someone I am following on Instagram a while ago and decided to tweak what they did and come up with my own version.
Embroidery was one of the first crafts my mom ever taught me. I remember embroidering on pillowcases and having so much fun picking out the different color floss. Of course, the first ones I did were not very good, but they helped me learn the basic skills and I could always tear our the stitches and start over.
For this project I found a great remnant at the fabric store that is a wide, uneven weave. I purchased a wooden hoop and glued the fabric to both sides - one at a time - after pulling the fabric taut and letting it dry. I then trimmed the excess fabric off close to the hoop. I purchased some brightly colored buttons and after placing them how I wanted, I put a tiny piece of scrapbook double sided adhesive underneath them, to help hold them in place. I attached them with natural jute twine and then made strings coming from them so that they would look like the balloons that I meant for them to appear to be.
After that was done, I thought of messages I wanted to say. I used a very fine sharpie and lightly wrote on the fabric. Taking a complimenting DMC floss, in my case, pink, I separated it into three strands (it comes in six). I stitched and followed my letters as best as I could and tried not to be too particular about it. This project was supposed to be about having fun - not about perfection.
The finishing touch was to take a whole piece of pink floss and tie a bow around the balloon strings.
For a quick, easy project, I think it turned out pretty well. My daughter is quite fond of it, so I am giving it to her. It makes me happy that she likes it so much - and I hope she takes the messages to heart. I think they are words we could all use to remember.
Let your dreams take flight and let your heart soar!
Hugs,
Sharon
I had an urge to do a craft that I haven't done in quite some time - embroidery! I got the idea from someone I am following on Instagram a while ago and decided to tweak what they did and come up with my own version.
Embroidery was one of the first crafts my mom ever taught me. I remember embroidering on pillowcases and having so much fun picking out the different color floss. Of course, the first ones I did were not very good, but they helped me learn the basic skills and I could always tear our the stitches and start over.
For this project I found a great remnant at the fabric store that is a wide, uneven weave. I purchased a wooden hoop and glued the fabric to both sides - one at a time - after pulling the fabric taut and letting it dry. I then trimmed the excess fabric off close to the hoop. I purchased some brightly colored buttons and after placing them how I wanted, I put a tiny piece of scrapbook double sided adhesive underneath them, to help hold them in place. I attached them with natural jute twine and then made strings coming from them so that they would look like the balloons that I meant for them to appear to be.
After that was done, I thought of messages I wanted to say. I used a very fine sharpie and lightly wrote on the fabric. Taking a complimenting DMC floss, in my case, pink, I separated it into three strands (it comes in six). I stitched and followed my letters as best as I could and tried not to be too particular about it. This project was supposed to be about having fun - not about perfection.
The finishing touch was to take a whole piece of pink floss and tie a bow around the balloon strings.
For a quick, easy project, I think it turned out pretty well. My daughter is quite fond of it, so I am giving it to her. It makes me happy that she likes it so much - and I hope she takes the messages to heart. I think they are words we could all use to remember.
Let your dreams take flight and let your heart soar!
Hugs,
Sharon
Monday, June 24, 2013
Graphic 45 French Country Creations
My mom recently re-did her kitchen. She got to repaint her kitchen in her favorite colors and get new light fixtures and accents that she picked out herself. Since I don't live near her and wasn't able to help, I did what I could made some new things for her walls! I love making crafts for my mom - in fact - most of the items I create are for her!
Lucky for me, her new colors go nicely with the Graphic 45 French Country line of paper - and as you will find out - I love Graphic 45!
Here is the card I made for her from one of the sheets of images of cut aparts:
On the inside I used a Birthday wished sticker from SRM - their products are amazing and they have something for every occasion imaginable! If you haven't used their products you must check them out! They make clear stickers that finish off your cards perfectly and the owner, Susan, is just the sweetest woman ever! They make more than just the stickers, and I love everything they produce.
For the wall canvas I took three sheets of the main page of the French Country paper and a 12x12 canvas. I modge podged one sheet down on the canvas and let it dry. Next, I fussy cut some of the
images out of the second sheet and adhered them down with foam squares and circles, depending on the shape and size of the pieces. (I had to cut some down to make them well hidden under the paper.)
Out of the third sheet I selected some of the images to fussy cut and not fully tack onto the second layer of pieces. This allowed me to fold and distress them to give the canvas more dimension and variety.


I enhanced the colors with Copic Spica pens. They add some shimmery color and a little 'pop' to the paper. I didn't add any color distressing to the canvas - I thought about putting some on the stamps, but with the colors and background already being kind of dark, I chose not to. I think the folding added just enough. I edged the sides of the canvas in dark brown crochet trim and I am ready to ship it out!
Sharon
Lucky for me, her new colors go nicely with the Graphic 45 French Country line of paper - and as you will find out - I love Graphic 45!
Here is the card I made for her from one of the sheets of images of cut aparts:
On the inside I used a Birthday wished sticker from SRM - their products are amazing and they have something for every occasion imaginable! If you haven't used their products you must check them out! They make clear stickers that finish off your cards perfectly and the owner, Susan, is just the sweetest woman ever! They make more than just the stickers, and I love everything they produce.
For the wall canvas I took three sheets of the main page of the French Country paper and a 12x12 canvas. I modge podged one sheet down on the canvas and let it dry. Next, I fussy cut some of the
images out of the second sheet and adhered them down with foam squares and circles, depending on the shape and size of the pieces. (I had to cut some down to make them well hidden under the paper.)
Out of the third sheet I selected some of the images to fussy cut and not fully tack onto the second layer of pieces. This allowed me to fold and distress them to give the canvas more dimension and variety.
I enhanced the colors with Copic Spica pens. They add some shimmery color and a little 'pop' to the paper. I didn't add any color distressing to the canvas - I thought about putting some on the stamps, but with the colors and background already being kind of dark, I chose not to. I think the folding added just enough. I edged the sides of the canvas in dark brown crochet trim and I am ready to ship it out!
Sharon
Subscribe to:
Posts (Atom)